No Bleed? We Can Help!
What Is Bleed?
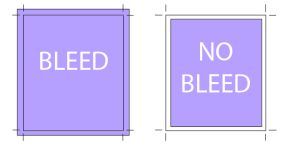
Printing bleed is a fundamental concept in the field of professional printing. It refers to the extra margin or space that extends beyond the final trim size of a printed document or design. This additional space is intentionally added during the design and prepress stages to ensure that the content, images, or colours reach all the way to the edge of the printed page after the document is trimmed.
The purpose of printing bleed is to account for small inconsistencies and variations that can occur during the cutting or trimming process. Printers use large sheets of paper or other materials and then cut them down to the desired final size. Without bleed, there's a risk that slight misalignments during cutting can leave unprinted white edges or gaps along the document's borders, which can detract from the overall appearance and professionalism of the printed piece.
To achieve a clean and polished appearance, designers and printers extend design elements (such as background colours or images) beyond the final trim edge into the bleed area. The typical measurement for bleed is 3mm, although it can vary depending on the printing requirements and the preferences of the print provider. By including bleed in the design, designers and print professionals ensure that the printed materials have a consistent and professional look with no unwanted white edges, creating a visually appealing and polished finished product.
Why Is Bleed Important?

The Playdough Cutter Analogy: Understanding Bleed
Bringing Print and Playdough Together Conceptually
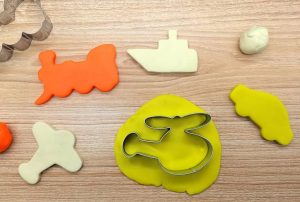
To grasp the importance of bleed, let’s draw a parallel with a common childhood pastime – using playdough cutters.
Implementing Bleed – Like Adding Extra Playdough
To create the perfect playdough star, you roll out the dough, press the star-shaped cutter, and here’s the crucial part – you add a bit of extra playdough around the edges, similar to a protective border. At ePrint Online, we understand this extra playdough is akin to what’s called “bleed” in the printing world.
Printing Bleed: The Role of Excess
Just as the additional playdough safeguards the star shape when the cookie cutter isn’t placed perfectly, bleed in printing allows your designs to extend slightly beyond the final trim size. This margin acts as a buffer for any potential misalignment during the cutting process, ensuring that your design reaches the very edges of the printed material.

The Bottom Line: Bleed Equals Polished Perfection
In both playdough and printing, the concept of excess is the key to a polished final product. When you add bleed to your print designs at ePrint Online, you guarantee a seamless, professional appearance. Just as your star-shaped playdough cutout looks complete and vibrant, your printed materials will capture the viewer’s attention with precision and quality.
Conclusion:
Bleed is a fundamental element in the world of printing that shouldn’t be overlooked. At ePrint Online, we understand it as the “extra playdough” that ensures your designs are full and polished, allowing you to create printed materials that leave a lasting impression. Whether it’s a magazine, brochure, or business card, embracing bleed is the key to maximising print quality and achieving visual perfection.
My files don't have bleed - How Do I Fix?
Select The Design Method Used From Below For Print Bleed Instrauctions


Step 1: Open Canva
Start by launching Canva and signing in to your account.
Step 2: Create a Custom Document
- Click “Create a design” on the Canva dashboard.
- Select “Custom dimensions.”
- Enter the dimensions for your final trimmed design. For example, if you’re creating an A4-sized document (210mm x 297mm), enter those dimensions.
Step 3: Ensure When Designing, Bleed area is visible and filled on each page.
To open the bleed settings, go to:
File > View Settings > “Show Print Bleed” – this unveiled area is your bleed zone.
Step 4: Start Designing
Begin designing your project within the canvas, keeping in mind to keep a buffer zone of 2mm away from the trim line for any text, logos or important design elements.
When adding a background to your design(s), always use the Background Function for solid background colours, fills or images. Do NOT use Elements, as they don’t automatically extend to the bleed zone.
Step 5: Export Your Design
Once your design is complete, you can export it for printing:
- Click the “Download” button in the upper-right corner of the Canva interface.
- Choose your desired file format (e.g., PDF or high-resolution image formats) for printing.
- Ensure that your design extends into the added bleed area to prevent any white edges after trimming.
Step 6: Review and Send to ePrint
Before sending your design to us, make sure that your content extends into the bleed area you added. Please remember to check there is a buffer zone of 2mm away from the trim for all critical elements. Marginal shift can occur when trimming off the bleed to finish size when dealing with digital printing, so this safety zone ensures a professional finish.
Always check Canva’s latest features and documentation, as their platform may evolve over time, and they may introduce new features related to adding bleed or print-related settings.
Step 1: Open Adobe Illustrator
Begin by launching Adobe Illustrator on your computer.
Step 2: Open Your Completed Design
- From the “File” menu, choose “Open” and select the completed design you want to add bleed to.
Step 3: Duplicate the Design
To preserve your original design, create a duplicate before adding bleed:
- In the Layers panel, right-click on your design layer.
- Select “Duplicate Layer” to create a copy.
Step 4: Adjust the Artboard Size
Now that you have a copy of your design, you’ll adjust the artboard size to include the bleed area:
- Go to the “Artboard” tool on the toolbar (Shift+O).
- Click on your artboard to select it.
- In the Artboard Options dialog, increase both the width and height of your artboard by the amount you want to add as bleed. For example, if you want a 3mm bleed on each side, add 6mm (0.6 centimeters) to both dimensions.
Step 5: Move Your Design to Fit
Since you’ve added extra artboard space, your existing design elements might not fully cover the extended area. Move your design elements to fit the new artboard size:
- Use the Selection tool (V) to select and drag your design elements to fill the extended artboard, ensuring that they reach the added bleed area.
Step 6: Save the Design
Once you’ve adjusted your design to fit the new artboard size, save your changes.
Step 7: Export Your Design with Bleed
Now you can export your design with the newly added bleed:
- Go to “File” > “Save As” or “File” > “Export.”
- Choose your desired file format (e.g., PDF, AI, or EPS) and specify your preferred export settings.
- Ensure that your design extends into the added bleed area to prevent any white edges after trimming.
Note: It’s important to remember that the added bleed area will be fully removed during the final trimming process. Ensure that crucial design elements are not placed too close to the edge of the bleed, as they may be trimmed off in the finished product.
By following these steps in Adobe Illustrator, you can add bleed retroactively to your completed design, ensuring a professional and seamless print result.
Step 1: Open Adobe Photoshop
Start by launching Adobe Photoshop on your computer.
Step 2: Open Your Completed Design
- From the “File” menu, choose “Open” and select the completed design you want to add bleed to.
Step 3: Duplicate the Design
To protect your original design, create a duplicate before adding bleed:
- In the Layers panel, right-click on your design layer.
- Select “Duplicate Layer” to create a copy.
Step 4: Adjust the Canvas Size
Now that you have a copy of your design, you’ll adjust the canvas size to include the bleed area:
- Go to “Image” > “Canvas Size.”
- Increase both the width and height of your canvas by the amount you want to add as bleed. For example, if you want a 3mm bleed on each side, add 6mm (0.6 centimeters) to both dimensions.
Step 5: Move Your Design to Fit
Since you’ve added extra canvas space, your existing design elements might not fully cover the extended area. Move your design elements to fit the new canvas size:
- Use the Move tool (V) to select and drag your design elements to fill the extended canvas, ensuring that they reach the added bleed area.
Step 6: Save the Design
Once you’ve adjusted your design to fit the new canvas size, save your changes.
Step 7: Export Your Design with Bleed
Now you can export your design with the newly added bleed:
- Go to “File” > “Save As” or “File” > “Export.”
- Choose your desired file format (e.g., JPEG, PNG, or PDF [preferred]) and specify the export settings that relate to “High Quality Print” or “Press Quality”
- Make sure that your design extends into the added bleed area to prevent any white edges after trimming.
By following these steps in Adobe Photoshop, you can add bleed retroactively to your completed design. This ensures that your design will be professionally and seamlessly printed, with no white edges after trimming.
Note: Keep in mind that while adding bleed to your design ensures a seamless appearance, the added bleed area will be fully removed during the final trimming process. Make sure that essential design elements don’t extend too close to the edge of the bleed, as they may be cut off in the finished product.
Contact your graphic designer and they should be able to re-supply your files with bleed at no charge. It is standard practice to design files with bleed for professional printing.
If you think it is too late to add the print bleed yourself, let ePrint do it for you as a last resort: ADD BLEED TO MY FILES


